The average customer communicates with companies across multiple channels, making the full customer journey fragmented and hard to follow. While this creates more opportunities for lead generation, it also makes it harder to track which interactions actually lead to conversions.
With offline conversion tracking for Google Ads, marketers can close the data gap by seeing which search ads result in offline sales or other valuable customer actions. This data can give you a better understanding of your ads’ ROI—and help you optimize your campaigns for the outcomes that matter most to your business.
Supercharge your Google Ads campaigns
Optimize your ad performance by automating essential tasks like customer list syncing and offline conversion tracking. For a limited time, Zapier users get 2,000 free tasks per month for 6 months, helping you scale your campaigns effortlessly. Learn about the limited-time offer.
Table of contents
Why offline conversion tracking matters
Most people running ads send Google one signal: Someone filled out a form. That’s enough to run ads, but it’s not enough to improve them. Google has no way of knowing which of those form fills turned into a paying customer, closed deal, or completed order, so it optimizes for what it can see. Over time, it gets good at finding people who fill out forms, but not necessarily people who buy.
Offline conversion tracking is how you fix that. Instead of stopping at the form fill, you send Google the outcomes that actually matter, like closed deals from your CRM, orders from your store, or leads that converted weeks later. Google uses that signal to find more people who look like your real customers, and to get smarter about where your budget goes.
The Zapier Send offline conversion action in the Google Ads integration makes this automatic. Instead of manually exporting a CSV and uploading it to Google every week—which is how most advertisers do it—a Zap watches your source (like a CRM, spreadsheet, or Shopify store) and sends conversions to Google the moment they happen.
How to track offline conversions in Google Ads with Zapier
Typically, tracking offline conversions can be a time-consuming process. It involves manually exporting conversion information, reformatting it, and uploading it to Google Ads. But with Zapier, you can shave hours from this task by automatically uploading conversion information to Google Ads from your CRM.
We’ll walk through setting up your Google Ads account correctly, making sure your GCLIDs are being captured, and building your Zap.
Zapier is the most connected AI orchestration platform—integrating with thousands of apps from partners like Google, Salesforce, and Microsoft. Use forms, data tables, and logic to build secure, automated, AI-powered systems for your business-critical workflows across your organization’s technology stack. Learn more.
Step 1: Set up a conversion action in Google Ads
Before your Zap can send anything, you need to create a conversion action in Google Ads and connect it to Zapier directly from inside the Google Ads interface. The good news is you don’t need to leave Google Ads to set up the Zap. The Zapier editor will open right inside the campaign manager.
Create a new conversion action
-
Sign in to Google Ads.
-
Click the Goals icon in the left navigation.
-
Under Conversions, click Summary.
-
Click + Create conversion action.
Select your data source
You’ll be asked to choose what you want to measure. Select Conversions offline, then click Save and continue.
A note on Enhanced Conversions for Leads: Google now recommends Enhanced Conversions for Leads as the more durable upgrade to standard offline import. And as of April 2026, Google is unifying its Enhanced Conversions settings so the same tag setup works for both web and leads simultaneously. Enhanced Conversions uses hashed email or phone data to match conversions rather than GCLID alone, giving you more accurate reporting and cross-device attribution. The Zapier action supports both methods. This tutorial covers the GCLID-based approach first since it’s the most common existing setup, but I’ll note where the Enhanced Conversions path diverges—and you’ll want it for the Shopify use case.
Choose your conversion category
Under Group your conversions, click See all and choose the category that matches what you’re measuring. The most common options for offline conversions are:
-
Qualified lead: a lead that meets your criteria but hasn’t yet converted to a sale
-
Converted lead: a lead that has converted to a sale or customer
-
Purchase: an order or transaction
Choose whichever reflects the actual business outcome you’re tracking. This is the signal Google will use to optimize your campaigns, so pick the one closest to the outcome that actually matters to you.
Select Zapier as your data source
Click + Create conversion, then select Zapier from the list of data sources. You’ll see the Zapier logo and a prompt to connect.
Click Save and continue.
Connect Zapier and build your Zap
You’ll see a Set up with Zapier panel inside Google Ads. Click Continue to authenticate with your Zapier account. Once connected, the Zapier editor opens directly inside the Google Ads interface—you don’t need to open another tab or navigate to Zapier separately.
Step 2: Make sure GCLIDs are being captured
This section sounds more technical than it is, so don’t panic.
Google uses a GCLID (Google Click ID) to link each conversion back to the original ad click. The GCLID is a unique identifier appended to your landing page URL when someone clicks a Google Ad. It looks like ?gclid=CjwKCAjw… at the end of the URL.
If you’re not capturing and storing GCLIDs alongside your leads, the conversion upload will fail silently or go unattributed.
If you’re connecting Google Sheets or your CRM: Open your Google Sheet or CRM and look for a GCLID column. If it’s empty or missing for recent records, fix this before building the Zap. Conversions uploaded without valid GCLIDs won’t attribute to any ad, and Google won’t notify you. They’ll just silently fail.
If you’re using Google’s native Lead Form assets: GCLIDs are captured and passed to Zapier automatically through the New Lead Form Entry trigger, so you have nothing extra to configure.
If you’re using a website form (HubSpot forms, Gravity Forms, Typeform, etc.): You’ll need a hidden form field named gclid populated with the URL parameter using JavaScript or your form tool’s URL parameter mapping. Most CRMs have native support for auto-capturing URL parameters as contact properties. Check your form settings or ask your developer to add a gclid hidden field.
If you’re using Shopify: GCLIDs aren’t natively stored with orders. We’ll cover the approach you’ll need to follow below.
Step 3: Build your Zap
Now you’re ready to set up your Zap. We’ll walk through three different ways to set up your workflow with different starting points:
Note: If you want to connect Google Ads to another CRM, spreadsheet, or eCommerce app, you can choose from thousands of apps in Zapier’s App Directory.
Start from HubSpot
For this tutorial, we’re going to walk through an example that uses HubSpot as the CRM where the lead was added. If you use a different CRM, you can still follow these same steps—just swap in your current CRM platform for the trigger app.
Set up your HubSpot trigger step
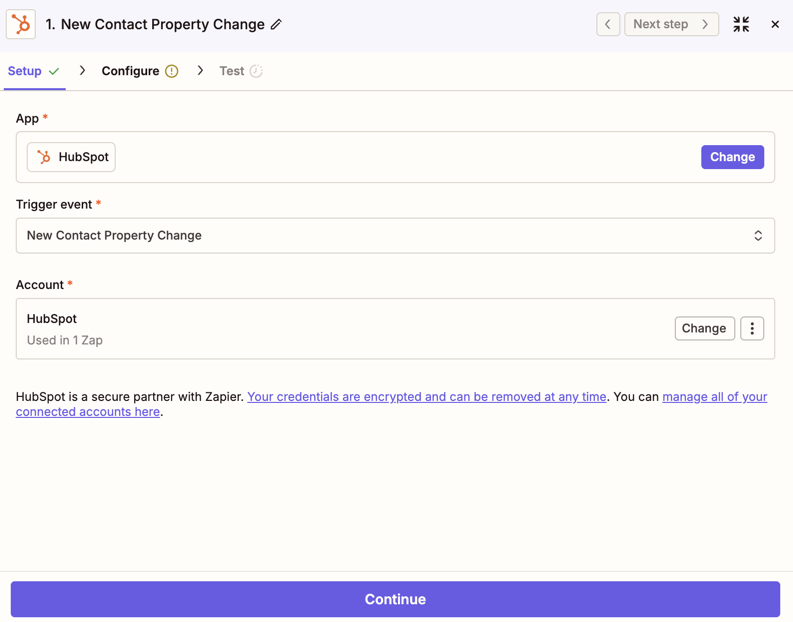
First, you’ll need to set up your trigger step. This is the event that starts your Zap. Choose HubSpot as the trigger app and New Contact Property Change as the trigger event. Then connect your HubSpot account, if you haven’t already, and click Continue.

Next, you’ll select the property in HubSpot that you’re using to track conversions. In this case, we’ll choose Contact Information: Lifecycle Stage. You can find this property by clicking the Property Name dropdown and searching for “lifecycle.”

Then, in the Additional properties to retrieve field, there are two additional pieces of information you need to retrieve from HubSpot: the property containing your Google Ads Click ID and the property that indicates when your conversion event happened. You’ll need these later on, when you’re setting up your Google Ads action step.
The names of these fields will look different depending on how you label them in your CRM. Click into the field and select the right one from your list of options. In this example, we’ll use Conversion information: Google ad click id and Contact activity: first conversion date.
Once you’ve added both properties, click Continue.
Next, you need to test your trigger. Click Test Trigger, and Zapier will find a lead in HubSpot and use the information from it as you set up the rest of your Zap.

Next, you need to test your trigger. Zapier will find a lead in HubSpot and use the information from it as you set up the rest of your Zap.
Click Test Trigger. Once it’s working properly, click Continue with selected record.
Set up your Filter by Zapier action step
Now let’s set up your first action. (Actions are events your Zap performs once it’s triggered.) Click the + button to add a new step to your Zap.

Choose Filter as your app, and click Continue.

Next, specify which leads you want to continue through the rest of the Zap. In this example, a lead becoming a “Marketing Qualified Lead” is our conversion event. So we’ll filter specifically for leads whose lifecycle stage has been changed to “Marketing Qualified Lead.”

Note: When setting up the filter, you’ll want to make sure that you enter the text exactly how it appears in your CRM.
Next, click + And, and add a filter to confirm that the lead’s Google Click ID exists. This tells you that the lead did, indeed, interact with a Google ad.
You’ll have a chance to test your filter rules to make sure they’re working as intended. Once you’re done and if your test is successful, click Continue.
Set up your Delay by Zapier action step
If the conversion event you’re tracking can occur within 24 hours of someone clicking on an ad, we recommend adding a delay step to the process.
Just like you did with the filter step, click the + button to add a new step to your Zap. Select Delay by Zapier as your app and Delay For as your event. Click Continue.

Next, specify how long you want your delay to be. Type in 24 in the Time Delayed For (value) field, and select hours from the dropdown in the Time Delayed For (unit) field. Click Continue.

Next, test your delay step by clicking Test step. When your test is complete, click the + button to add the final step of your Zap.
Set up your Google Ads action step
Now, set up your Google Ads action step to track your conversion. Choose Google Ads as your app and Send Offline Conversion as your event. Connect your Google Ads account, if you haven’t already, then click Continue.

Now, it’s time to customize your Google Ads conversion step. This is where you will specify what conversion information you send to Google Ads.
In the Use Google Ads as… field, select your Google Ads account information from the dropdown.

In the Google User Identifier Source field, select Google Click ID (GCLID) from the dropdown. Then, in the Google Click ID (GCLID) field, search for and select the HubSpot property containing the ID.

Next, use the Conversion Action field to specify what lead activity counts as a conversion. In this case, it’s Quality Signup—but it might look different for you based on the types of conversion events you’ve set up in your Google Ads account.
Click the + icon in the Timestamp field. Search for and select the HubSpot property that indicates when the conversion took place.

You can further customize your action step by adding data in the Value and Currency fields. That only applies if your conversion is linked to a purchase or the closing of a deal, though, so we’ll leave it blank in this example.
Once you finish customizing your Google Ads step, click Continue. Zapier will then test your action step by sending an offline conversion to Google Ads. Click Test step.
Once you’ve run a successful test, you’re ready to use your Zap. Just click Publish to turn it on.
Start from Google Sheets
If you’re logging Google Ads leads into a spreadsheet rather than a CRM, you can still send offline conversions to Google Ads automatically. The setup is similar to the HubSpot workflow above, but the trigger and field mappings change. We’ll walk through the differences here.
Before you start, your sheet needs a GCLID column populated at the time each lead comes in—either through the Google Ads Lead Form Zapier trigger, or via your website form as described earlier in this article. You also need a Status column where you (or your team) mark leads as “Won” or “Customer” when they convert.
Set up your Google Sheets trigger step
Now, go to the Zap editor and choose Google Sheets as the trigger app and Updated Spreadsheet Row as the trigger event. Then connect your Google Sheets account, if you haven’t already, and click Continue.
Next, select the spreadsheet and the correct sheet tab from the dropdowns. In the Trigger column field, select your Status column—this tells Zapier to only fire when that specific column updates, not on every edit to the row.

Click Continue, then test your trigger step. Once it’s working, click Continue with selected record.
Set up your Filter by Zapier action step
Just like in the HubSpot setup, this filter is the step most people skip the first time, and it creates a mess. Without it, the Zap fires on every single row edit—when someone adds a note, updates a phone number, or fixes a typo. You’ll burn tasks and, worse, send duplicate or premature conversions to Google that will never match a real GCLID.
Click the + button to add a new step, choose Filter as your app, and click Continue.
Set up the filter so it only continues if your Status column exactly matches “Won” (or whatever value you use to mark a converted lead). Then click + And and add a second filter to confirm that the GCLID field exists—this confirms the lead actually came from a Google ad.

Test your filter rules. If the test passes, click Continue. For best results, you’ll also likely want to set up a delay step, like we walked through with our previous HubSpot example.
Set up your Google Ads action step
The Google Ads action step works the same way as in the HubSpot workflow above. Choose Google Ads as your app and Send Offline Conversion as your event. The only differences are the field mappings, since the source data is coming from a spreadsheet instead of a CRM.
Map the fields like this:
-
Conversion name: Paste the exact name from Part 1 (e.g., Sheets – Lead Converted)
-
Google Click ID: Map the GCLID column from your sheet
-
Conversion time: Map the date you marked the lead won—not the original lead date. Using the actual conversion date is what gives Smart Bidding accurate attribution.
-
Conversion value: Map your Deal Value column if you track it
Once you finish customizing your Google Ads step, click Continue and run the test. Mark a test row as “Won” and confirm it shows as successful in your Zapier Task history. You’ll see the conversion in Google Ads within 24–48 hours.
Start from Shopify
If you’re running a Shopify store, you want Google to know which orders came from ad clicks—so it can optimize toward buyers, not just people who visited a product page. The Zap structure is similar to the HubSpot workflow above, but Shopify has one quirk worth covering before you start.
Shopify doesn’t natively store GCLIDs with orders. When someone clicks a Google Ad and arrives at your store, the GCLID is in the URL. But unless you’ve added custom tracking to capture it and attach it to the customer record, it won’t be available when the order comes in. That gives you two paths.
Option A: Enhanced Conversions via email (recommended for most stores)
Instead of GCLID, Google matches the conversion using the customer’s hashed email address. It does this by looking up whether that email belongs to a signed-in Google user who clicked your ad. This is the path Google now recommends for all advertisers, and Zapier handles the hashing automatically.
Set up your Shopify trigger step
Set up your trigger step by selecting Shopify as the trigger app and New Order as the trigger event. Connect your Shopify store, if you haven’t already, and click Continue.
Test the trigger. Zapier will pull a recent order to use as test data. Once it’s working, click Continue with selected record. For best results, you’ll also likely want to set up filter and delay steps, like we walked through with our previous HubSpot example, before setting up your Google Ads step.
Set up your Google Ads action step
Like the HubSpot and Google Sheets workflows, you’ll use Send Offline Conversion as the action event. But this time, map the customer’s email instead of a GCLID, and Zapier will handle the hashing for you.

Map the fields like this:
-
Conversion name: Shopify – Purchase
-
Email: Map Customer Email from the order (Zapier hashes it automatically before sending)
-
Conversion time: Map Created At from the order
-
Conversion value: Map Total Price
-
Conversion currency: Map Currency
It should look something like this:

For this to work, Enhanced Conversions must be enabled on your conversion action in Google Ads—look for the Enhanced Conversions toggle in your conversion action settings. The match rate depends on how many of your customers are signed into Google accounts, which for most consumer audiences is high.
Click Continue, run the test, and publish your Zap once it’s successful.
Option B: GCLID-based (more accurate, more setup required)
If you want stricter attribution and you have developer support available, you can capture the GCLID from the landing URL and store it as an order note or customer metafield. Use a Shopify app or a custom checkout script to do the capture, then map that field in the Zap exactly like the HubSpot workflow does.
This path is more reliable for attribution, but requires developer involvement upfront. For most Shopify advertisers, Option A gets you most of the way there without the dev work.
Step 4: Verify your tracking is working
Once your Zap runs its first live event, go into your Google Ads dashboard and do the following:
-
Go to Goals > Conversions > Summary
-
Select Conversion Action in the menu at the top.
-
Use the All conv. (by conv. time) column to see uploaded conversions. You should check this column since it records conversions by when they happened, not when the original click occurred.
Next, cross-reference what you see in Google Ads with your Zapier task history. The number of successful task runs should match the conversions recorded for the same time window. Because your upload contains the conversion time, you can compare both reports for a specific date range and the numbers should align. If you’re uploading to the same conversion action from multiple sources (e.g., both Zapier and a CSV upload), the total conversions in your Campaigns Report should equal the sum of Zapier uploads plus CSV uploads
What to expect after setup
Give yourself 2 to 4 weeks of conversion data before you draw any conclusions. Smart Bidding models need a minimum volume—typically 30–50 conversions per month per campaign—to optimize effectively. In the early weeks, you may see bidding behave more conservatively—that’s the model calibrating. Give it time to do its work.
Once it has enough signal, spend shifts toward the campaigns and keywords that actually produce closed deals—not just form fills. If you’re passing deal or order value, you’ll also see ROAS reporting move from proxy metrics to real revenue outcomes. The cleaner your conversion data, the faster this happens.
Here are a few habits worth building:
-
Mark conversions promptly (within a few days of the conversion event, not weeks later),
-
always use the actual close date rather than today’s date,
-
and be consistent about which stage or status triggers the Zap.
Spend less time tracking
As a business owner or marketer, continually optimizing your processes is key to driving growth.
Take this Google Ads workflow, for instance. Instead of spending hours of your busy work week uploading your offline conversion data from spreadsheets, you can automatically send your offline conversions to Google Ads and optimize your campaigns in real time. That means you can get a more accurate picture of which ads are working—and spend less time manually moving data around.
This article was originally published in January 2021. It was most recently updated in May 2026.